WP Rocket – Best Cache Plugin to Speed up WordPress 2020
There are various ways you can do to increase website speed. One of the most popular is using the cache plugin. Fortunately, WordPress offers a large selection of cache plugins with powerful features. One of them is WP Rocket.
With WP Rocket, your website’s performance can run faster so the user experience will be better. Then, how to use it?
This article will explain it thoroughly. From how to install to how to set WP Rocket from zero. But before discussing further, we will explain in advance what WP Rocket is. Please pay attention!
What is WP Rocket?
WP Rocket is a WordPress cache plugin with premium or paid services that can speed up website loading. This plugin has been quite popular for a long time, as evidenced by the number of users who have reached more than 1 million accounts.
Unfortunately, this plugin does not provide a free trial package for first use. They only offer paid licenses with a choice of 3 categories, namely:
- Single – for $ 49 with 1-year usage for 1 website.
- Plus – for $ 99 with 1-year usage for 3 websites.
- Infinite – for $ 249 with 1-year usage for unlimited websites.
Advantages of WP Rocket Plugin
If you look around, WP Rocket license fees are quite expensive for a plugin. Moreover, not a few users who often compare it with other plugins. For example WP Rocket vs W3 Total Cache, or WP Rocket vs Litespeed Cache, both of which are popular and also free.
So actually, what are the benefits of WP Rocket? Here are the reviews:
1. User-friendly dashboard
WP Rocket plugin has an easy-to-use dashboard, both for beginners and professionals. That way, you can easily activate or deactivate every feature in it.
2. Already have the Lazy Load Media feature
With WP Rocket, you no longer need to install a lazy WordPress plugin. Because WP Rocket already provides a lazy load feature, which means it will only bring up an image or video when the user sees it.
3. Delete the database
This plugin provides features to clean your WordPress database and delete the amount of resources that are no longer needed automatically. Its function is to reduce the database load and make the loading process faster.
4. Cloudflare
WP Rocket has also been integrated with Cloudflare for those of you who use the CDN server service. In addition to providing security from DDoS attacks, this feature is also a supporting factor for websites to work faster.
5. GZIP compression
To reduce bandwidth usage, WP Rocket provides a feature to compress GZIP. GZIP can reduce your files so that the website loading process can be faster.
How to Setting WP Rocket Plugin in WordPress
After getting to know WP Rocket and its advantages, we will now discuss how to set up WP Rocket Plugin in WordPress. Please follow one by one!
Step 1 – Download and Install WP Rocket
As we know, this plugin does not offer a free version. So, inevitably you have to buy one of the licenses that can be purchased through the official website of WP Rocket.
After a successful subscription, you can immediately log in to your verified account via email and download the plugin link to be saved on your computer.

Once downloaded, you can now install the WP Rocket plugin into your WordPress account. For those of you who don’t know how to install the plugin on WordPress, you can follow the steps in this article.
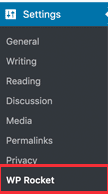
Then, you can start changing WP Rocket settings by clicking the WP Rocket in the WordPress Settings menu.
Step 2 – Get to know the Rocket WP Dashboard
After entering the settings, you will be directed to the dashboard page. There you can see information on the type of license that is actively used along with the expiration date.

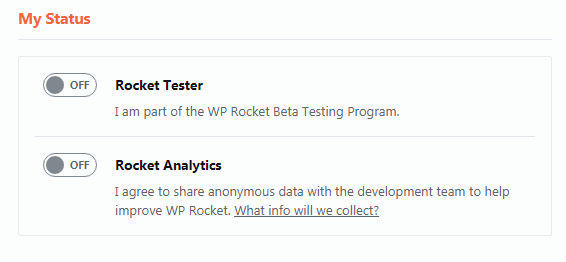
Here you can try the Rocket Tester feature, which is a program for testing Beta. You can also enable Rocket Analytics to share data anonymously with their developer team. The goal is that they can analyze the performance of your WP Rocket and improve it.
If you encounter problems in the middle of use, you can find the solution in the FAQ (Frequently Asked Questions) column. You can also click the Ask Support button to receive assistance directly from the WP Rocket support team.

At the far right of the dashboard, there are 3 types of Quick Actions features, namely:
- Remove all clear cache – recommended for use after you have finished configuring WP Rocket settings.
- Start cache preloading – caching feature found on the main page of the website, including internal links.
- OPcache content purge – removes OPcache content to prevent problems when updating plugins.

Step 3 – Cache Settings
WP Rocket has activated the caching feature by default. However, you can also change a few settings to get more speed. Here is how:

- Enable the Enable caching for mobile devices column to make your website more mobile-friendly. Then, also select the Separate cache files for the mobile devices column to ensure that mobile users get the full caching experience.
- Then, you can click on the Enable caching for logged in WordPress users feature. This feature is very useful for those of you who have a website with a membership feature or login system if users want to see your content.
- Lifespan Cache feature functions to set the time period for you to save cache files on the website. Here, you can freely set a time of more or less than 10 hours, depending on how often you update the website.
Step 4 – File Optimization Settings

On this page, you can minimize the size of various files such as HTML, CSS, and JavaScript files. You can freely activate any features that are needed.
However, in most cases, this arrangement does not have such a significant impact on overall website performance.
Unless your website has such large traffic as e-commerce, then this feature can have a real effect. Like reducing bandwidth usage or saving your hosting costs.
But sometimes, minimizing file sizes can also potentially cause unexpected risks.
Step 5 – Lazy Load Media
Images are often one of the second heaviest items on web pages after videos. The loading process is longer than the text. So, to get around this, many websites use the help of the lazy loading plugin.
Instead of loading all the images at once, the lazy loading feature will only display the image when the user sees it. In this way, loading your website can run faster.
Fortunately, the WP Rocket plugin comes with a default lazy loading feature. The way to activate it is to open the Lazy Load settings like the picture above, then you can choose which features you want to activate. Here is a full explanation of each feature:

- Lazy load images – this feature functions to enable lazy loading on every photo on the web page.
- Lazy load iframes and videos – You can enable lazy loading for iframes and videos.
- Replace YouTube iframe with preview image – works to replace YouTube iframe with preview image which helps speed up web pages if there are many YouTube videos.
- Disable emoji – enabling the emoji caching disabled feature can help reduce the number of HTTP requests and increase loading.
- Disable WordPress embeds – this feature should be enabled for users who want to avoid embedding ( embedding ) your content.
- Click Save Changes.
Step 6 – Preload Settings
In the Preload section, by default, the WP Rocket plugin can crawl the main page of your website. Besides, WP Rocket also preloaded the cache on each link listed in it.
However, in this setting there are several other features that you can activate or deactivate with the following function:
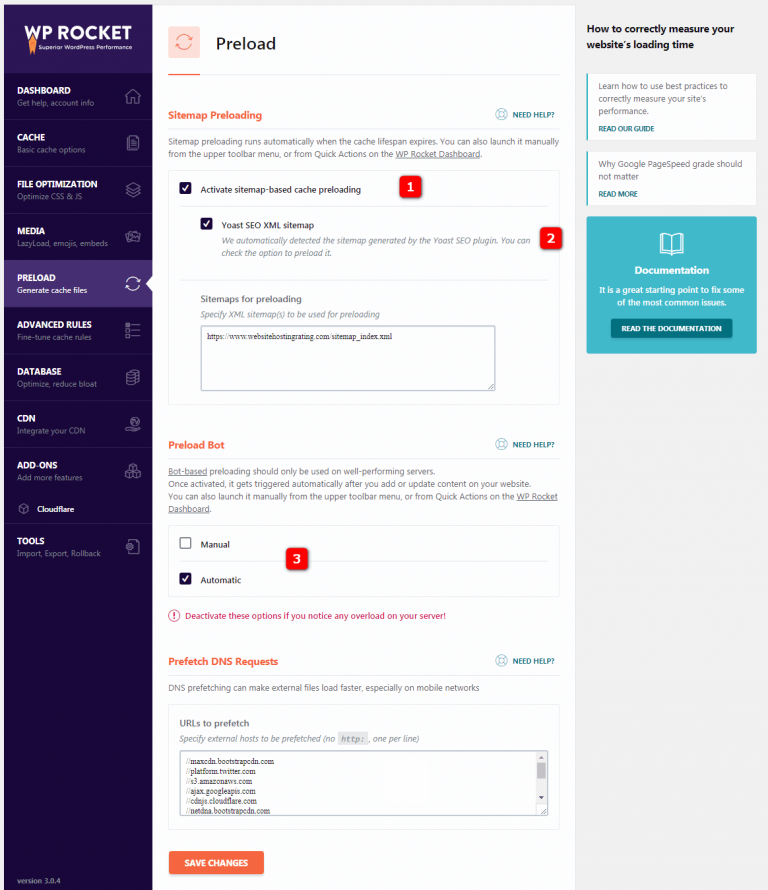
- Activate sitemap-based cache preloading – feature to be able to use all the URLs in your XML sitemap to be able to preload when the cache has expired or has been deleted.
- Yoast SEO XML sitemap – You can also enable this feature to be able to preload any XML sitemap generated from the Yoast SEO plugin.
- Preload bot – functions for automatic caching every time you add or update content on a website.
- When you have finished activating some of the features above, click Save Changes.
Step 7 – Advance Rules Setting
WP Rocket plugin gives you ease to control the caching process on web pages. Including determining which pages do not want to be cached. To do this, you can open the settings page in the Advanced Rules tab as shown above.
There, you can disable caching at certain URLs, cookies, user agents (browser and device type ), to reactivate automatically if needed. But actually, the default settings are qualified enough to make the website work fast.
Usually, this Advanced Rules setting is only needed by developers with complex website systems.
Step 8 – Database Settings
Besides being able to specify certain pages that you don’t want to be cached, WP Rocket also provides a feature to delete your WordPress database.
This feature does not provide a significant effect on website performance. However, you can review some of the options in this Database setting:
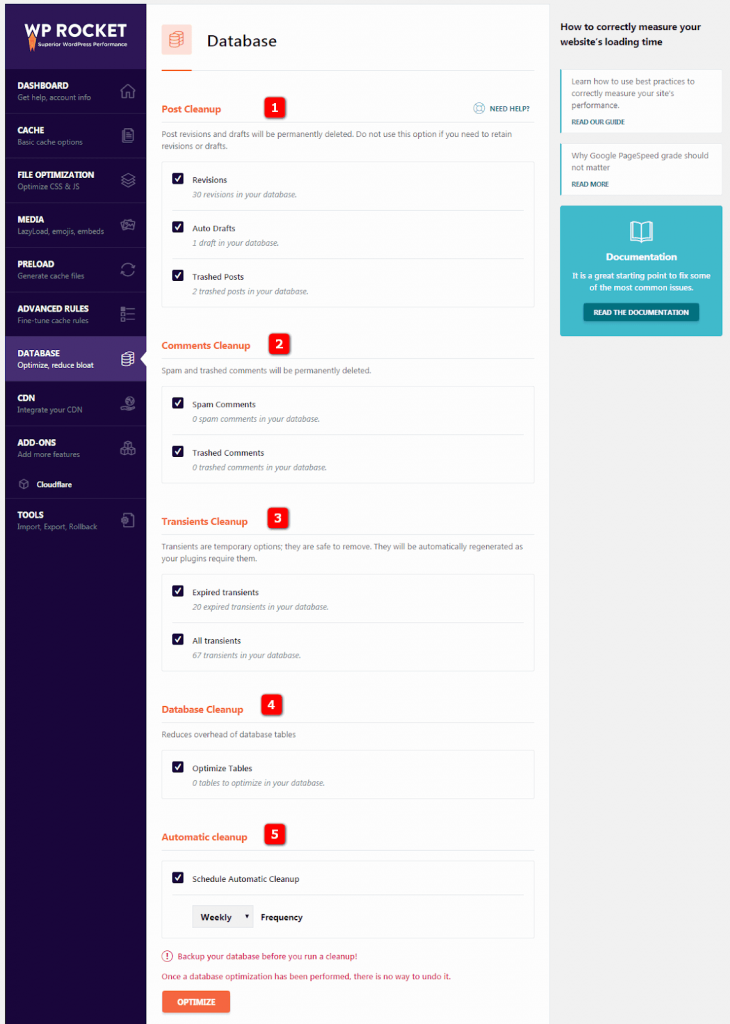
- Post cleanup – in this option you can delete various revision data, auto drafts, or pages in the trash. However, we do not recommend you to activate it, unless you have backed up the data before it is permanently deleted.
- Comments cleanup – to delete spam and wasted comments.
- Transient cleanup – functions to delete data stored temporarily.
- Database cleanup – removes the database table.
- Automatic cleanup – this feature functions to set an automatic database deletion schedule.
Step 9 – CDN settings
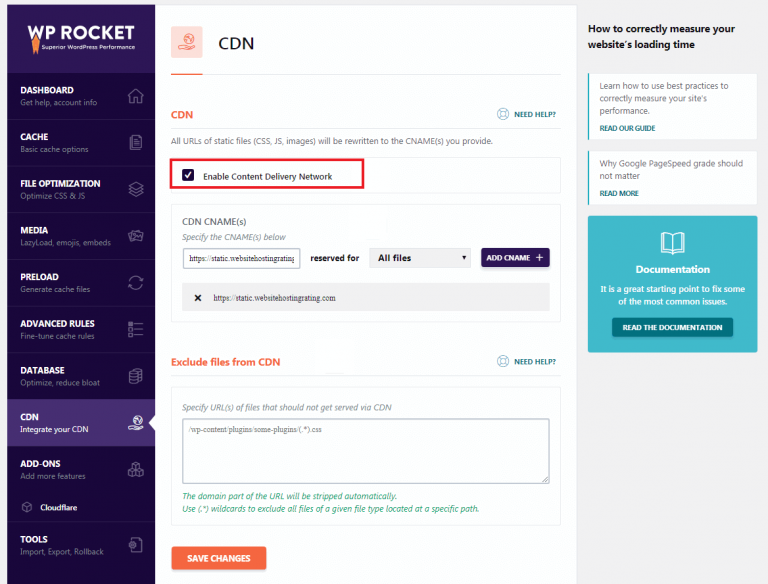
If you use a CDN (Content Delivery Network) server for the website, you can connect it to WP Rocket. The trick is to open the CDN settings tab, then check the Enable Content Delivery Network feature to activate it.
By activating this feature, your website speed can increase rapidly. Because CDN allows users to download files that are on your website through the nearest server location.
Besides, the CDN is also effective in reducing the burden on hosting servers which results in increasingly responsive website performance.
Step 10 – Add-ons
In addition to being able to integrate with the CDN server service, you can also integrate Cloudflare accounts with WP Rocket through the Add-Ons settings tab. After that, you can fill in several columns like:
- Global API Key – well, to find out your API key, the way is to log in your Cloudflare account, then scroll down to the bottom and you will find the API key there. After that, copy and paste into the Global API Key column in this setting.
- Email account – fill in the name of your email that is used on the Cloudflare account.
- Domain – fill in the domain name of your website.
- Optimal Settings – enable the Optimal Settings feature to increase the configuration, speed, and compatibility of your Cloudflare.
- Click Save Changes.
Step 11 – Tools Settings
Well, in the last setting that is Tab Tools, you can export and import the plugin settings data that you have done. So, when you want to move WordPress from server to server or replace the old domain to a new domain, you don’t have to bother setting WP Rocket anymore from the start.
Following are the functions of each option:

- Export settings – allows you to export WP Rocket settings to your other site.
- Import settings – useful for importing previously configured WP Rocket settings.
- Rollback – You can return the plugin to the previous version if there are problems in the new version.
Alternative Website Speed Plugins
Maybe not all users are willing to spend money to buy plugins. But still, there are other cache plugins that you can use for free. One of them is LiteSpeed. What distinguishes it from WP Rocket? Here is a comparison between the two:
| Featured | LiteSpeed Cache | WP Rocket |
Caching | ||
| Static Full-Page Cache | ✔ | $ |
| Browser Cache Support | ✔ | $ |
| Tight Integration with Server | ✔ | ⛌ |
| User Logged-In Cache | ✔ | $ |
| Private Cache | ✔ | ⛌ |
| Cache Separate Mobile View | ✔ | $ |
| Exclude Selected URI’s Form Optimization | ✔ | ✔ |
| Purge Selected URLs on a Schedule | ✔ | ⛌ |
| Tage-Based “Smart Purge” | ✔ | ⛌ |
| Pre-caching (built-in crawler) | ✔ | $ |
| Mobile / AMP Cache | ✔ | ⛌ |
WordPress Optimization | ||
| HTML Minify | ✔ | $ |
| Database Optimization | ✔ | $ |
| Remove Query Strings | ✔ | $ |
| Remove Google Fonts | ✔ | $ |
CSS / JS Optimization | ||
| Content Delivery Networks (CDN) | ✔ | $ |
| Wildcard Usage in CDN Support | ✔ | ⛌ |
| CSS Minify / Combine | ✔ | $ |
| CSS HTTP / 2 Push | ✔ | ⛌ |
| Load CSS Asynchronously | ✔ | $ |
| Critical CSS (CCSS) Generation | ✔ | ⛌ |
| Minify JavaScript | ✔ | $ |
| JavaScript Combine | ✔ | $ |
| JavaScript HTTP / 2 Push | ✔ | ⛌ |
| Load JavaScript Deferred | ✔ | $ |
Image Optimization | ||
| Image Optimization | ✔ | ⛌ |
| WebP Support | ✔ | ⛌ |
| Lazy Load Images | ✔ | $ |
| Lazy Load iframes | ✔ | $ |
| LQIP Placeholder | ✔ | ⛌ |
Advanced Caching | ||
| Object caching (Redis, memcache) | ✔ | ⛌ |
| Vary Cache on User Group, Geo Location, Currency, etc. | ✔ | ⛌ |
| Cache Vary Support | ✔ | ⛌ |
| REST API cache | ✔ | ⛌ |
| Edge Side Includes (ESI) | ✔ | ⛌ |
Support & Compatibility | ||
| WordPress Multi-Site Support | ✔ | $ |
| WPML multi-language support | ✔ | $ |
Besides being equipped with various qualified features, the Litespeed cache plugin has also been integrated directly with LiteSpeed Web Server (LSWS). LiteSpeed Web Server is a server that has 6 times faster performance than other servers.
Closing
Discussing the quality of website speed, it’s not negotiable if you want to create the best user experience. Many benefits can be obtained by having a qualified website speed. Starting from the increasing number of visitors, getting a ranking, until the potential to get leads.
Using the WP Rocket cache plugin is one solution for making websites faster. You can enjoy various features such as a user-friendly dashboard, CloudFlare service, lazy load, automatic database cleaning, and GZIP compression.
However, if you want an alternative plugin with a free service, you can use the LiteSpeed cache plugin.


