How to Display Internet Speed in Windows 10, 8, 7
To monitor internet speed on a PC or laptop, we can use an application that can display download and upload traffic on the taskbar. Thus we can see how fast our internet connection is, and can immediately tell if the network is down.
There are many advantages if we can monitor internet traffic running on Windows all the time. For example, when internet traffic suddenly goes fast but we are not doing anything, then we can investigate whether there is an application that is updating, then we can turn it off.
For Windows 10 users, displaying internet traffic on the taskbar is also quite useful to prevent Windows from updating when the internet quota is low, or when we are using a computer for other purposes. Because if Windows 10 does an update it will usually suck up a lot of quota and make the system heavy. (See: tips to speed up loading Windows 10 )
When the internet speed is running very fast in Windows 10 even though we are not downloading, then we can be sure it is because Windows 10 is updating. This way we can stop it for a while and resume it later if there is a lot of quota or there is a Wi-Fi connection.
On this occasion, I will share various ways to display internet speed on PCs and laptops for Windows 10, 8, and 7 users.
How to display internet speed in Windows
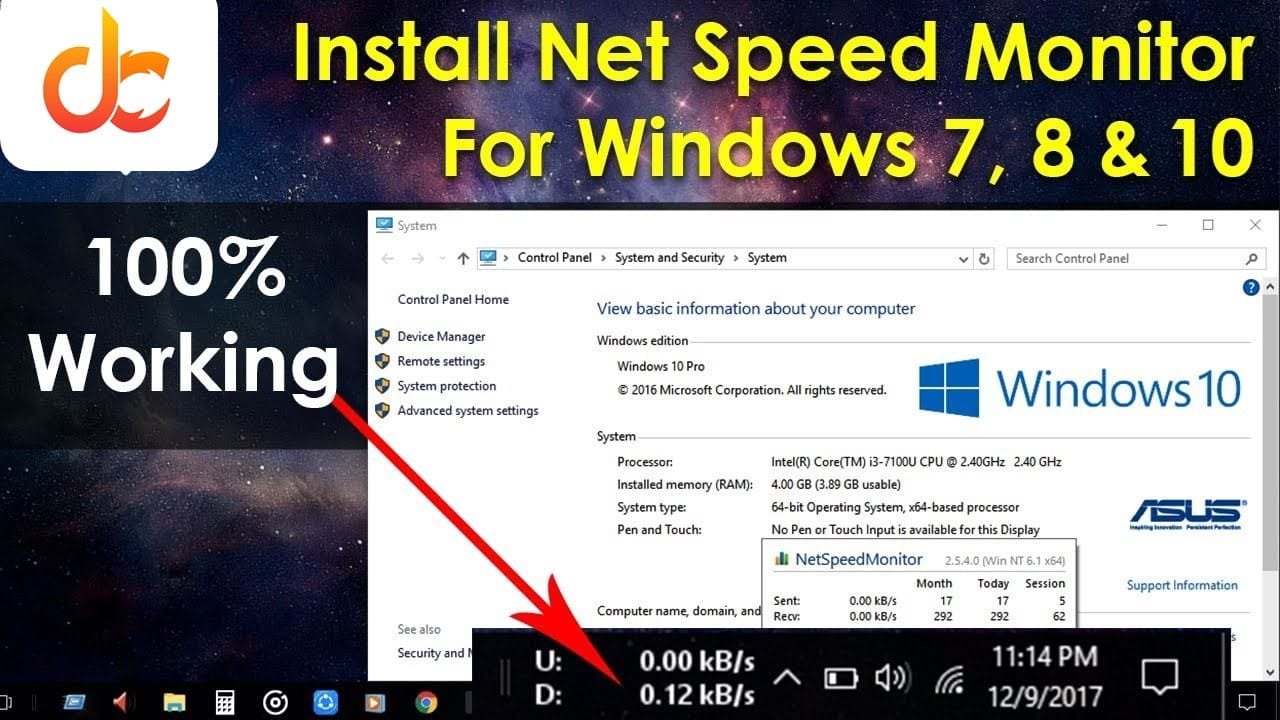
1. Install the NetSpeed Monitor application
The first step we have to install is the internet speed monitoring application on Windows. One of my favorite applications that I still use is NetSpeed Monitor. This application is free but has features that are quite complete and accurate in displaying internet speed on the Taskbar.
Just download it from the link below, choose the one that matches the Windows architecture on your computer, whether 32-bit or 64-bit. This application supports Windows 7, Windows 8, and Windows 10.
After downloading the extract file first, then install it as usual.
2. Install the widget on the Taskbar
After the NetSpeed Monitor application has been successfully installed, the next step is to install the monitoring widget on the Windows Taskbar. By installing this widget we can monitor internet speed on our laptop or PC in real-time, both download and upload speeds.
The trick is to right-click on an empty area of the Taskbar> select Toolbars> select NetSpeed Monitor.

The NetSpeed Monitor widget will be installed on the Taskbar, but the monitoring process is not yet running. We need to make arrangements first.
3. Select the network used
Then right-click on the widget, check Monitoring and then click on the Configuration option.
On the Network Interface menu, select the connection used on your computer.
There are several options there, if you don’t know which one to choose then just try them one by one then click the OK button. If the network selection is correct, the internet speed will run on the widget. If the internet speed is not working, it means that the selected network is not correct, choose the next one until you find the right one.
4. Change the bitrate unit
After finding the right network, we can see the internet speed running on the Taskbar, but the bitrate units are still using kbit / s there. To change it to kB / s, which is the most commonly used unit, we must first convert it.
The trick is to right-click on the widget> select Configuration> on the bitrate option select kB / s.
After that click OK. Then look again at the widget, the internet speed bitrate unit will change to kB / s.
5. Set the appearance of the widget as you wish
To change the appearance of the widget as desired, you can right-click again on the widget> select Configuration> select Layout.
In this menu we can change the font type and size, the position of the widget, the download and upload indicators, and how many digits the internet speed will display.
The settings that I use:
- Font: Segoe UI size 8, Bold
- Glowsize 0
- Inner Position Horizontal: Center, Vertical: Middle
- Show Bitrate
- Value Width: 6. This is used to determine how many digit bitrate will be displayed, if it is past the specified it will be converted to units above (MBps).
- Download: D. This is an indicator for download, can also be changed to Download or use other symbols as desired
- Upload: P.
See the following image for more details:
If you use the same settings as in the image above, the result will look like this:
When finished adjusting the display as you wish, click the OK button. Done, we have successfully installed a widget for monitoring internet speed running on our computer.
Another feature that I like about this application apart from displaying internet speed on the Taskbar is that we can view internet usage statistics per day and month. For those of you who feel the need to monitor how much internet quota is spent each month, you can take advantage of this feature.
The trick is to right-click on the NetSpeed Monitor widget> select Data Traffic.
There you will see how much internet data is used per day. To change it to per month, change the Group option to Month. For units, you can use MB or GB.
The picture above is an example of monthly internet usage statistics on my computer. I don’t know if that includes a little or a lot, it could be that your internet usage is much more than that, especially for those who like downloading. What is clear is that by using this application we can see the statistics.
Until here, the tutorial is on this occasion, good luck and hopefully useful.