
UEFI & Bios: Solve Issues & Update in 8 easy steps
If the computer doesn’t want to start at all, the cause can be in the BIOS. Here we will show which settings you absolutely need to know and how to update the BIOS without any risk and how to solve any issue with UEFI and Bios first we will discuss:
How to Solve Issues with UEFI and Bios
If Windows no longer finds the correct hard disk when booting or if USB and network ports are no longer available, you should first make the settings in the BIOS or, for newer PCs, the UEFI.
Secure Boot security

Since Windows 8, the UEFI/BIOS has mastered a function that the old firmware does not offer – the so-called Secure Boot. This technology ensures that no malware can get into the boot process after being switched on and then manipulate the start of the operating system. A boot virus is particularly dangerous because many antivirus programs do not work if the virtual villain has been on board since the system was started.
Problem 1: The PC does not boot from DVD
In practice, the Secure Boot works as follows: Applications must have suitable digital keys that are checked by the UEFI. If there is no key or a key is incorrectly signed, the system does not start. Therefore, it can sometimes happen that older versions of Windows or Linux distributions cannot start from external storage media. However, Secure Boot can also be deactivated.
Solution: To switch off the technology, proceed as follows: Immediately after switching on the PC, press F2, Del or F12 several times on the keyboard. You will be shown the correct key when you start the system – then, for example, “Press F2 to enter BIOS settings” appears briefly on the screen.
Alternatively, refer to the manual for your mainboard. Once in the menu, look for the “Advanced Settings” option. In our example we use the mainboard MSI H97 Gaming 3, which is why we use Secure Boot as follows: “Settings -> Advanced -> Windows 8 / 8.1 Configuration”. The feature can be switched off under this entry.
Problem 2: Someone changed the BIOS settings
The options you set in the BIOS have different values. A family member or colleague has probably made changes that are now causing problems.
Solution: If you do not want anyone to mess around in your BIOS settings, access to the firmware can be protected with a password. Under “Security” you can assign passwords that can be divided into administrators and users. For example, critical BIOS areas can be locked that only the administrator can access. A start password can also be assigned, which appears immediately after the computer is switched on and only continues the system start if it has been entered correctly.
Tuning – More performance for the hardware
A modern UEFI BIOS offers numerous possibilities to tickle a few percentage points more performance out of the hardware. However, tuning is not always successful.
Problem 3: The PC starts slowly

One of the tasks of the UEFI-BIOS is to check that all system components are ready to run at startup. Only when this initialization is successful does the firmware start loading the operating system. However, this hardware check costs valuable time, especially for systems with many interfaces and built-in expansion cards or attached peripherals such as printers or webcams.
Solution: Fortunately, the above process can be prevented by activating the “Fast Boot” function. You can find this setting in the advanced settings or in the boot section of the UEFI. The firmware then provides the Windows system with special UEFI drivers that can be loaded more quickly. However, the connected hardware must also support this function. The time saved with the UEFI Fast Boot option can be up to 70 percent.
Another way to speed up the startup of the PC is to rearrange the boot order. For example, the firmware checks the USB connections and the optical drive, whether the PC should boot from it. If several hard disks are installed, these are also searched for the operating system. So put the system hard drive in the first place to prevent the search for further starting options.
To do this, navigate to the “Boot” menu in the BIOS and set the appropriate medium to “Boot Option # 1”. If the disk on which the operating system is installed cannot be selected there, you must first change the “UEFI Hard Disk Drive BBS Priorities” and set the system memory to first place. Note that you have to change this order again if you want to start from a USB stick. For example if you want to use an emergency system.
Problem 4: The PC should be overclocked
You can get a little more performance out of a PC. This does not work with all PCs.
Solution: To increase the performance of your PC, it can be overclocked in the UEFI. Mainly there is an increase in the clock frequencies of the processor and main memory. But this overclocking only works with certain CPUs and mainboard chipsets. At Intel, it is the processors with a “K” or “X” in the model name.
These have a free multiplier: its value times the basic system clock results in the clock frequency of the CPU. If you increase the multiplier, the processor clock and, of course, the computing power also increases. But the chipset must also play along because particularly cheap Intel chipsets do not know this function. In general, overclocking is only possible with Z or X chipsets, but there are exceptions to this,
In AMD, the processors can be overclocked with the “Black Edition” addition via the multiplier. With the Ryzen processors, the multiplier is basically unlocked on all models. Here you just have to pay attention to the correct chipset. When overclocking, you should make sure that there is sufficient cooling – because a higher clock also means an increased power consumption.
Overclocking should always be done with caution and the multiplier raised gradually: Incorrect settings can quickly lead to damaged components. With some boards, you can, therefore, leave it to the UEFI to overclock the system. For this, the manufacturers provide corresponding assistants that overclock the hardware fully automatically. At MSI, this function is called “OC Genie”, Asus calls the assistant “EZ Tuning Wizard”.
The functionality of these tools is always the same in principle: The manufacturer has checked the system with various components in internal tests and saved the best functioning overclocking values. The assistant compares these results with the built-in hardware and applies them accordingly. He also takes voltage and temperature values into account. Overclocking is not just limited to raising the multiplier, it also adjusts voltage values, memory timings and the speed of rotation of fans.
The manufacturer tested the system with various components in internal tests and saved the best-functioning overclocking values. The assistant compares these results with the built-in hardware and applies them accordingly. He also takes voltage and temperature values into account. Overclocking is not just limited to raising the multiplier, it also adjusts voltage values, memory timings and the speed of rotation of fans.
The manufacturer tested the system with various components in internal tests and saved the best-functioning overclocking values. The assistant compares these results with the built-in hardware and applies them accordingly. He also takes voltage and temperature values into account. Overclocking is not just limited to raising the multiplier, it also adjusts voltage values, memory timings and the speed of rotation of fans.
If the overclocking still goes wrong, you don’t have to worry: the wizards automatically reset the default values in the event of a crash. With some OC tools it is even possible to choose the degree of overclocking, depending on the built-in cooling, among other things. Nevertheless, you should not proceed too briskly here either and first, select the lowest overclocking level.
After that, play and work with the system for a few hours to be completely sure that the overclocked computer is running stably. If this is the case, you can consider whether you want to go to the next higher level.
Problem 5: The settings made are annoying

You have experimented with the various options in the UEFI BIOS and now the computer no longer wants to start up.
Solution: Settings that you make in the UEFI BIOS are saved by the system in a chip that listens to the acronym CMOS. This is a volatile SRAM memory chip that the manufacturer integrates on the mainboard. Volatile means that all settings of the UEFI are deleted and reset to the factory settings as soon as there is no longer any operating voltage on the module. That is why the CMOS has its own battery that provides the necessary voltage, even when the PC is completely disconnected from the power. A CR2032 button battery is usually used for this as standard.
However, sometimes you may need to reset the UEFI. The reason for this can be incorrect settings after which the system no longer starts or the installation of new hardware. If you use a new processor or RAM, for example, you should actually reset the firmware so that there are no conflicts between the old BIOS settings and the new component.
More expensive mainboards make it easy for you, because here often just a push of a button is enough. Read the manual. If you have a cheap mainboard in your computer, you have to do a little more. Because then you usually have to move a jumper. How this works is described in the manual of the PC or the mainboard.
Problem 6: The UEFI BIOS is old, the support advises to install an update
But you have no idea how it works. To keep up with the progress of technology, the UEFI can be updated. For example, new versions bring support for new CPUs or faster RAM or include stability improvements. Sometimes the manufacturers also equip the UEFI with additional functions. However, the update process carries some risk. Because if it is not successful, in the worst case it can mean that the system no longer starts. However, if you follow the steps below, you are usually on the safe side.
Solution: In general, the following is important: Make sure that you have downloaded the correct UEFI version for your mainboard. To do this, you first need to find out the exact model name of your mainboard – it should be in the manual and printed on the board itself. Or you can use the free tool CPU-Z: After you have installed the program, you will receive the necessary information for your UEFI update under the “Mainboard” tab.
The first point of contact for a new version should be the official website of the computer manufacturer – for a complete PC or notebook, for example, a provider like Acer or HP. They do not manufacture mainboards but can be supplied by the respective manufacturers with special, mostly functionally slimmed-down versions for their complete systems. In this case, you also need a special BIOS version. Also very important for the UEFI update: Never interrupt the process! Otherwise the system may fail.
Problem 7: The manufacturer software for the mainboard shows an update for the UEFI BIOS
What should I do? Almost every motherboard manufacturer now offers corresponding update tools for the UEFI BIOS. This makes updating a child’s play and, above all, safe.
Solution: The manufacturer tools automatically recognize the motherboard installed in the PC and download the correct versions from the manufacturers’ servers from the Internet. Then the update takes place – either directly under Windows on the desktop or after a restart of the system.
You can find the updated tools on the driver DVD that comes with the mainboard or on the support pages of the respective manufacturer. Many UEFI variants themselves also offer the option of having the firmware updated automatically. At MSI you can find the function in the UEFI setup under “M-Flash”, at Asus it is called “EZ-Flash” and at Gigabyte “Q-Flash”.
BIOS & UEFI update in eight steps – safe and fast
Whether new CPU or memory upgrade – often nothing works without a BIOS or UEFI update. We reveal how you can update your bios / UEFI safely in 8 steps.
Problem: You have bought a new processor – such as a new Ryzen processor – but the Basic Input Output Systems (BIOS) or newer motherboards of the bios successor Unified Extensible Firmware Interface (UEFI) does not recognize the CPU and breaks at the Initialize the boot process. This is because your bios / UEFI is out of date and does not know new processor models. The problem can also arise when installing more or faster RAM: Either the Bios / UEFI does not identify the entire amount of memory or the RAM runs at a lower clock frequency than the manufacturer intended. In the worst case, the initialization of the memory can fail and the boot process stops at this point.
Solution: An update of the Bios / UEFI helps. Attention: Nothing should go wrong with the update. Because it overwrites basic information that your PC needs after switching on – if it is missing, it does not startup. With our instructions you will reach the update destination safely.
Step 1: Identify the mainboard and the BIOS or UEFI version
The Exact model designation
manufacturer and model of the mainboard can be found in the manual for the mainboard. The model name – for example
GA-B150-HD3P – and often the manufacturer is usually also printed on the circuit board, or there is a sticker on a card slot. Be sure to note the revision number – such as REV 1.02. If the motherboard itself or the manual does not provide sufficient information, the exact model name can also be found using a software tool such as a CPU-Z (download) and read out SiSoftware Sandra Lite 2018 (download).
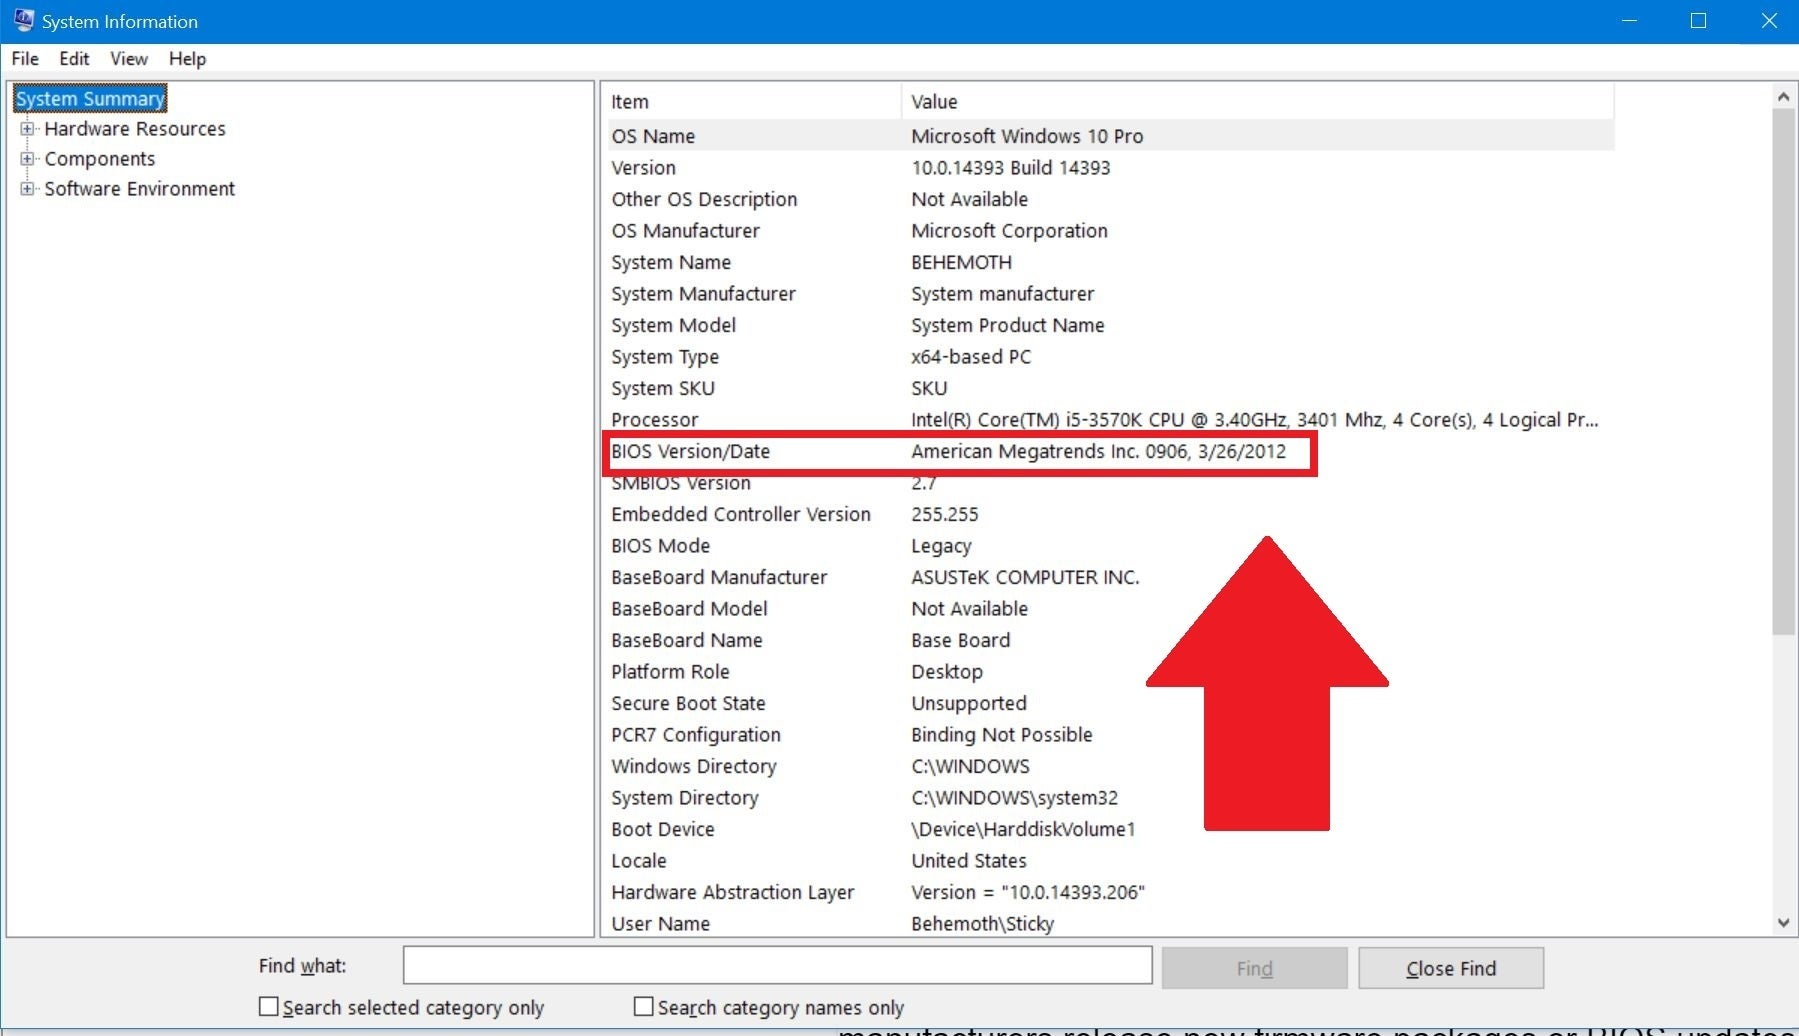
The currently used BIOS or UEFI version can often be found in the system information of Windows 10. To do this, simply enter “msinfo32.exe” in the search input field. In the area “System overview” you will find the corresponding note in the right area under “BIOS Version/date”.
Reading the boot screen
The screen when booting usually reveals important information about the board manufacturer, board model and BIOS version. To be able to read it in peace, press the pause button. If only a manufacturer logo is displayed instead, press DEL, ESC or F2 once.
Step 2: Find and download update files
Update download
The updated files are usually available on the mainboard manufacturer’s website. If you already have a UEFI mainboard, you can automatically download BIOS updates via the menu item of the same name or tools directly via UEFI.
For complete PC systems – for example from Acer, Dell, Fujitsu or Medion – First, take a look at their website and only in the second step on the mainboard page. After entering the model name, you will find the appropriate update files as well as other downloads.
Compare the information: Is the mainboard name correct? Is the bios offered on the Internet more current than that on the mainboard? In the case of older motherboard models, the BIOS update consists of two parts: a flash program for describing the BIOS module and the actual BIOS file.
Weighing the necessity and risk
Even if you follow all the tips, your PC may no longer work after the update and all attempts to restore it may fail. Therefore, you should check before the update whether the new BIOS version solves your problem at all. Read the release notes for the update files. They are usually supplied as a TXT file or summarized under the download link.
Especially with CPU and memory problems, many manufacturers offer so-called support lists, which list exactly which BIOS version supports which CPUs or memory stick models.
Step 3: backup
prevent all eventualities, you should back up important files externally before the flash process. A failed BIOS update does not endanger the data on the hard disk; but if the update goes wrong, your PC may be out of action for longer. With the saved files you can at least continue working on another PC.

Step 4: update decision – Windows, Bios or DOS?
Three options
Many manufacturers now offer BIOS updates that run under Windows or that can be started automatically in the BIOS or UEFI. With old motherboards you often have to import BIOS updates under DOS.
Update under Windows
If you want to carry out the update directly in Windows, you need an update utility for your operating system. Look for “Liveupdate” or “Install Program for Windows” in the service area. After downloading and installing, start a trial run; you do not have to fear an accidental bios update at this time. The tool also shows you the current version and the model name of the mainboard. Depending on the program, select “Check BIOS information”, for example.
Update via Bios or UEFI
In many modern bios and actually all UEFI menus, the flash program is already integrated in the “Tools” menu. You then usually do not even need the BIN file from the manufacturer side, since the tool automatically downloads the appropriate current version if there is an internet connection. If this automatic is missing, download the BIOS update (a BIN file) from the manufacturer’s website onto your computer’s hard drive and then select the storage location in the tool. Since the update is started from the BIOS, no boot medium is required.
Update under DOS
For older computers, the BIOS update must still be done under DOS – the rudimentary operating system sub-structure of Windows. In this case you need a bootable USB stick. To make a USB drive bootable, format it in FAT-16 format and label the boot sector with Ox80. Windows’ own formatting function cannot do this but for example the freeware PeToUSB. The tool shows the name of your USB drive under “Target drive:”. Activate “Allow formatting” and “Activate LBA (FAT16X)”. “Copy options” must be deactivated.
After clicking on “Start” your USB drive will be formatted and bootable but does not yet have any files. You can get this at masterbootrecord.de, for example. Click on the link “DOS boot disk with some useful tools”. Download and run the Wbootess.exe file. Change the unpacking program from “Writing on Floppy” to “File Extraction”. When specifying the path, you must specify your USB drive via “Browse …”. Delete all unnecessary files.
Then download the BIOS file – usually as an EXE or ZIP. Unzip it into a new directory on your hard drive: In addition to the flash program, at least one file with the extension BIN (for award bios), ROM (for AMI or Phoenix bios) or with a letter and number combination should be about 3A0 – stand. If there is also an “Autoexec.bat” or “Update.bat” in the extracted files, the update is particularly easy. Save this file on the boot medium. The flash tool starts the batch file automatically with the appropriate parameters if it is on the same medium together with the BIOS file.
Step 5: Prepare Bios
Before the update, make a few BIOS settings. When you switch on your PC, it shows – depending on the model – a manufacturer logo, the memory data, the processor name, clock speeds and much more. Press F2 or Delete.
Remove write protection
Some boards protect BIOS from accidental deletion. If you find an option in the menu such as “Flash Bios Protection”, “Firmware Write Protect”, “Bios Guardian” or “BIOS-ROM Flash-Protect”, then set this to “Disabled”. Protection is sometimes carried out using a jumper. Check the manual or the manufacturer’s website.
Save BIOS settings
If you have done all sorts of tuning in the menu, you should note the current settings. To update, load the factory settings (via “Exit, Load Setup Defaults”).
Boot order
Usually a PC boots from its SSD or hard drive. In the menu, which is usually called “Advanced Bios Features” or “Boot, Boot Device Priority”, you can change the boot order. Declare your USB drive as the primary boot medium (“1st Boot Device”) by selecting the name of the medium or an option such as “USB-HDD”. Save the settings and restart your PC.
Step 6: Carry out the Bios Update

Directly in the BIOS
Go to the BIOS menu under “Tools, EZ Flash 3”. You can then use this tool like the flash program described below.
Under Windows start the Live Update – in our case, it is called “ASUSUpdate”, for example. Actually, it would be enough to choose “Update BIOS from the Internet” – but you are better served with the method described below since it also creates a BIOS backup: You can do this by selecting “Save current BIOS file” and click on “Next”. After specifying the storage location, the block is readout.
Next, download the actual BIOS file – select “Download BIOS from the Internet”. If the preset server is not accessible, click once on “Auto Select”. If a newer update program than the one currently installed is found, the program will now show you this – download it, uninstall the old version and install the new one. You should see updates no later than the second attempt. Download the desired version.
Select Update Bios From File, select the downloaded file and click OK. Now the PC shows you a summary of the old and the new BIOS data – check whether, for example, the model name of the mainboard and the version numbers are correct. Click “Update” to start the update process. If you get a success message from the program, restart your PC.
Under DOS,
plug the prepared USB into the PC and switch it on. The PC now boots up to the DOS prompt. Enter the name of the flash tool, for example “awdflash” in the case of an award bio, and press “Return”. The flash program starts and displays the BIOS ID and the BIOS date, among other things. Create a backup of the existing BIOS module – how this works is shown at the bottom of the screen (usually with the “B” key).
Then select the new BIOS file. It is checked whether it matches the active version. You will then be asked whether the update should really be carried out. Confirm with “Z” (because on the English keyboard the “Y” for “Yes” would be here). The flash program shows the progress of the update. White fields mean that the sector was written successfully, red fields indicate an error. The flash process takes about a minute. Important: Wait until the flash process is completely finished! Then remove the USB stick and restart the PC.
Step 7: clean up bios and device manager

If the flash program has carried out the update successfully, you can put your PC back into operation after three short steps.
Clear CMOS
The CMOS is a battery-backed memory chip that contains the BIOS settings. The new BIOS may store certain settings in a different CMOS register than the old one – this can lead to conflicts and the PC may not even boot properly after the update. Therefore, delete the content of the CMOS after the update. You can find out how in the PCB manual. Most of the time you have to disconnect the PC from the power supply and move the jumper for a short time.
Restore your own settings
After the update or after resetting to the factory settings, you can configure Bios again as required. Exit the BIOS setup after you have saved your values with “Save & Exit”.
Step 8: If the worst comes to the worst, get the old bios back
Despite all prudence, an update can also go wrong and abort the flash program with an error message. Don’t turn off. Regardless of whether directly in the BIOS, under Windows or under DOS: First, close the Flash tool. Repeat the flash process with the created backup file.
If the PC no longer picks up after a restart, try clearing the CMOS (step 7) to get your PC up and running again. If this also does not work and you do not have a replacement BIOS chip on the mainboard, contact the hotline of the board manufacturer: There you are either referred to a specialist dealer who reprograms the BIOS module, or you have to use the module send to the manufacturer.
Also Read
23 Best Printers (2020): Buying Guide With Tips
Dell Alienware Aurora R9, rounded design hides a great gamer