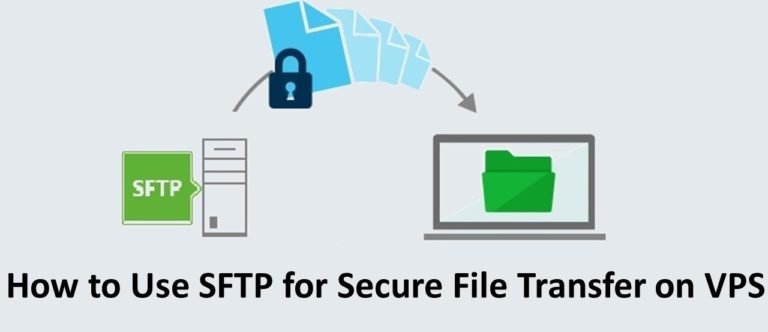

How to Make a Virtual Host on Ubuntu & Debian
To manage multiple websites or URLs in one VPS server, you need to use Virtual Host. Creating a Virtual Host is a method for adding multiple domains using only one server IP.
In this guide, we will provide two ways to create Virtual Hosts on Ubuntu and Debian, namely on the Apache and Nginx web servers.
How to Make a Virtual Host on Ubuntu & Debian Using Apache
Before creating a Virtual Host on Apache, make sure you have installed Apache on the Ubuntu and Debian servers. The following are the steps to create a Virtual Host in Apache. Follow the guidelines below!
Step 1: Create a New Directory
First, all you need to do is create a structure on the directory server. This is what will be used to store website data.
The location for storing website data in Apache is in the directory. Then in the directory, you will create a folder to store content for each domain.
/var/www/html/var/www/htmlpublic_html
Following is the command to create a directory:
# sudo mkdir -p /var/www/html/public_html
Step 2: Give Access Permissions
To modify files in the directory, you need to change the Permissions access that the root user still has. So, normal users can change files in the directory.
/var/www/html/
Following is the command to grant access Permissions:
sudo chown -R $USER:$USER /var/www/html/public_html
The $ USER variable will take the value of the user that is active when the ENTER key is pressed. Currently, the server you are using can add or change content that is in the directory.
/var/www/html
Step 3: Create a Demo Page for Virtual Hosts
You need to create a demo page from html. The function of this page is for website demos that we add to the Virtual Host.
To create a demo page, open the directory public_htmlusing the following command.
# cd /var/www/html/public_html
Create a file in the directory public_html. In this guide, we use file names. Enter the following command to create a file:index.htmlindex.html
# touch index.html
Then open the index.html file using the following command.
# nano index.html
Then, copy the HTML code below into the file. Then save using the command Ctrl + X >> Y >> ENTER .index.html
<!DOCTYPE html>
<html>
<body>
<h1>Selamat!!!</h1>
<p>Pengaturan Virtual Host Berhasil.</p>
</body>
</html>

Step 4: Create a New Virtual Host File
Next is the process of creating a new Virtual Host in the Apache webserver. Apache has a default Virtual Host named. This virtual host can be used as an example of default settings. You can copy the contents to create a new Virtual Host file for each of your domains.000-default.conf
This guide uses the Virtual name Host. Every Virtual Host file must end in .website-1.conf.conf
Copy the contents of the file into the file using the following command.
000-default.confwebsite-1.conf
sudo cp /etc/apache2/sites-available/000-default.conf /etc/apache2/sites-available/website-1.conf
Then open the file using the following command.website-1.conf
nano /etc/apache2/sites-available/website-1.conf
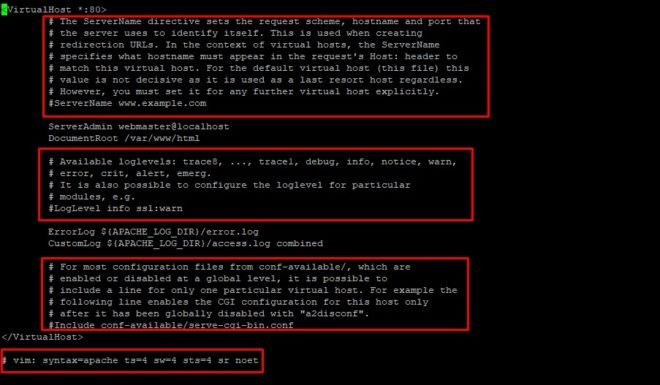
Then the contents of the file more or less like in the picture below. website-1.conf
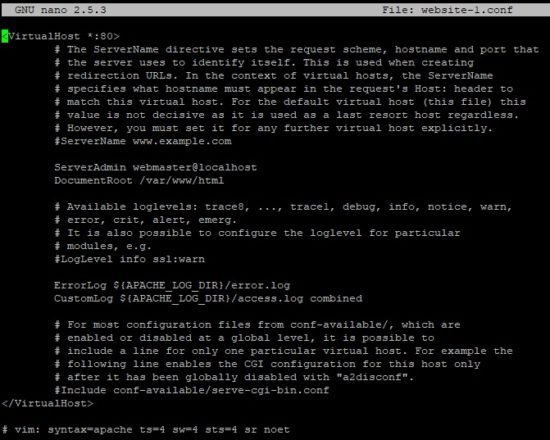
In the file, you can arrange and add some new code to suit your domain needs. The file will read all requests on port 80 (the default HTTP port).website-
1.confwebsite-1.conf
For the next step, you can delete some of the text in the file that has a # sign at the beginning of each text. The # sign is used to provide information regarding the use of Virtual Host files.website-1.conf
Then, you need to change the default ServerAdmin to the email used by the administrator (your email). This guide uses an example email .admin@website-1.com
ServerAdmin admin@website-1.com
After that, you need to add two codes, which are named ServerName and ServerAlias.
Server name functions to provide information on what domains will use this Virtual Host. ServerAlias functions to determine the other address you want to use this Virtual Host example www.
ServerName DomainAnda.comServerAlias www.DomainAnda.com
Finally, you need to set the DocumentRoot Virtual Host to work in the directory public_htmlthat was created.
DocumentRoot /var/www/html/public_html
Here are the final results of the contents of the file. You can copy the file below into your file .website-1.conf.conf
<VirtualHost *:80>
ServerAdmin admin@website-1.com
ServerName DomainAnda.com
ServerAlias www.DomainAnda.com
DocumentRoot /var/www/html/public_html
ErrorLog ${APACHE_LOG_DIR}/error.log
CustomLog ${APACHE_LOG_DIR}/access.log combined
</VirtualHost>
Copy the code above into the file that you created. Then save using the CTRL + X >> Y >> ENTER command ..conf
Step 5: Activate the New Virtual Host File
After you create a new Virtual Host file, you need to activate the virtual host you have created.
To activate the file, use the command. The following is the complete command..confa2ensite
sudo a2ensite website-1.conf
Then, disable the default Apache configuration in the file. Use the following command.000-default.conf
sudo a2dissite 000-default.conf
Then to apply the results of the configuration, you need to restart Apache. Following is the command to restart Apache.
sudo systemctl restart apache2
Step 6: Check Results
After all, the configuration is done, you need to check whether your Virtual Host setup was successful.
How you can access the domain that has been added in the Virtual Host ServerName. If the display appears as shown below, your configuration will automatically succeed.
Display website above is the result of the file that has been created in the directory .index.htmlpublic_html
How to Make a Server Block ( Virtual Host ) on Ubuntu and Debian Using Nginx
In the Nginx web server, there is another name for the Virtual Host, namely Server Block. Server Block itself functions the same as Virtual Host. Both are used to configure more than one domain in one server.
There are seven steps to creating a Server Block in Nginx. Here is the guide:
Step 1: Install Nginx and Activate
The first step in creating a Server Block is to install Nginx on an Ubuntu server. You must enter the following command to install Nginx:
# sudo apt-get install Nginx
Wait until the installation process is complete, and you can continue to the next step.
Step 2: Set the New Directory Configuration
Next, you need to create a structure on the directory server. This will later be used to store website data.
The location for storing website data in Nginx is in the directory. In the directory, you will create a folder to store the contents of each domain. /var/www/html/var/www/htmlpublic_html
Following is the command to create a directory:
# sudo mkdir -p /var/www/html/public_html
Step 3: Give Access Permissions
To be able to modify files in the directory, you need to change the Permissions access that the root user still has. That way normal users can change files in the directory ./var/www/html/
Following is the command to grant access Permissions:
sudo chown -R $USER:$USER /var/www/html/public_html
The $ USER variable will retrieve the currently active user’s value as the ENTER key is pressed. Now the server you are using can add or change the content in the directory ./var/www/html
Step 4: Create a Demo Page for Server Block
Then, you need to create a demo page from html. This page functions for website demos that we add to the Virtual Host.
Enter the directory public_htmlthat was created using the following command.
# cd /var/www/html/public_html
Create a file in the directory public_html. In this guide, we use file names. Then enter the following command:index.html
# touch index.html
Then open the index.html file using the following command.
# nano index.html
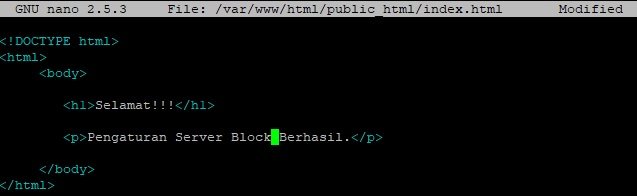
After that, copy the html code below to the index.html file. Then save using the command Ctrl + X >> Y >> ENTER .
<!DOCTYPE html>
<html>
<body>
<h1>Selamat!!!</h1>
<p>Pengaturan Server Block Berhasil.</p>
</body>
</html>
Step 5: Create a New File Server Block
Then is the process of creating a new Server Block on the Nginx web server. Nginx has a default Server Block named default. You can use this as an example of the default settings of Server Block. Later you can copy the contents to create a new Server Block file for each of your domains.
This guide uses the name Server Block website-2. Copy the contents of the default file into the website-2 file using the following command.
# sudo cp /etc/nginx/sites-available/default /etc/nginx/sites-available/website-2
Then open the website-2 file using the following command.
nano /etc/nginx/sites-available/website-2
Then the contents of the website-2 file are more or less like in the image below.
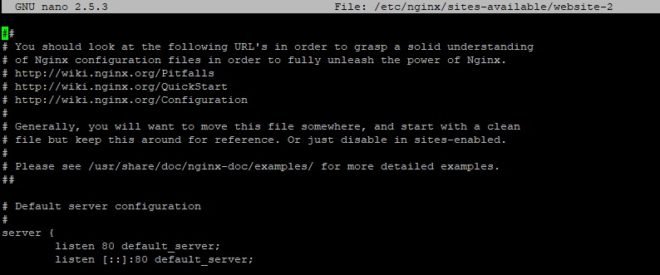
In the website-2 file, you can set and add some new code to suit your domain needs. The website-2 file will read all requests on port 80 (the default HTTP port).
For the next step, you can delete some of the text contained in website-2 files that have a # sign at the beginning of each text. The # sign is used to provide information regarding the use of Virtual Host files.

After that, you need to add a code, named Server_Name, whose function is to provide information on what domains will use this Virtual Host. Then to determine the other address, you want to use this Virtual Host example www.
server_name DomainAnda.com www.DomainAnda.com;
Finally, you need to set the Root Server Block to work in the directory public_htmlthat was created.
Root /var/www/html/public_html
Here are the final results from the contents of the website-2 files. You can copy the file below into your Server Block file.
server {
listen 80;
listen [::]:80;
root /var/www/html/public_html;
index index.html index.htm index.nginx-debian.html;
server_name DomainAnda.com www.DomainAnda.com;
location / {
try_files $uri $uri/ =404;
}
}
Copy the code above into the Server Block file that you have created. Then save using the CTRL + X >> Y >> ENTER command .
Step 6: Activate the New File Server Block
After you finish creating the new Server Block file, activate the Server Block that you have created.
To activate the Server Block file, use the command. The following is the complete command.ln -s
# sudo ln -s /etc/nginx/sites-available/website-2 /etc/nginx/sites-enabled/website-2
Furthermore, to test the script error that has been written in the Server Block file, you can use the following command.
sudo nginx -t

If the output is like the picture above, the next step you can restart. Restarting is done so that all configurations that have been changed can be applied. Following is the command to restart Nginx.
sudo systemctl restart nginx
Step 7: Check Results
After all, configurations are done, you can check whether your Server Block setup was successful how you can access the domain that has been added to Server_Name Server Block. If an image appears as below, your configuration will automatically succeed.
The website display above is the result of the index.html file that has been created in the public_html directory.
Conclusion
Using Virtual Host on a server can help you create many websites in one VPS server. The trick is to follow the steps above.
Hopefully, this article helps you to create a Virtual Host on Ubuntu and Debian. If you have questions, feel free to leave comments in the fields provided below.